使用 Windows* 部署映像服务管理器和 Windows* 错误检查等工具扫描磁盘驱动器的完整性问题并尝试修复
总结
如果最终用户对检查系统磁盘驱动器上信息的完整性感兴趣,请参阅以下指南。
如果您熟悉命令行界面或具有类似的技术知识,则可以按照下面提供的手动步骤检查系统上信息的完整性。
确保您的数据已备份,然后按照提供的详细说明进行操作。完成此过程所需的时间因系统配置而异,但所有步骤最多可能需要一小时。
开始这些过程之前的重要信息:
确保您的系统正常运行(即,如果您可以登录并与 Windows* 交互)。
建议移除所有外部连接的存储设备(USB、SD 卡等)。
在此过程中,可能会重新启动。
本指南可能会定期修改,因此请检查 solidigm.com/support 上的源代码,以确保您拥有最新版本。
您必须具有管理权限才能运行这些进程。
1. 执行错误检查
请按照以下步骤扫描所有内部存储驱动器(操作系统、辅助驱动器等),以查找潜在的文件完整性/结构错误。
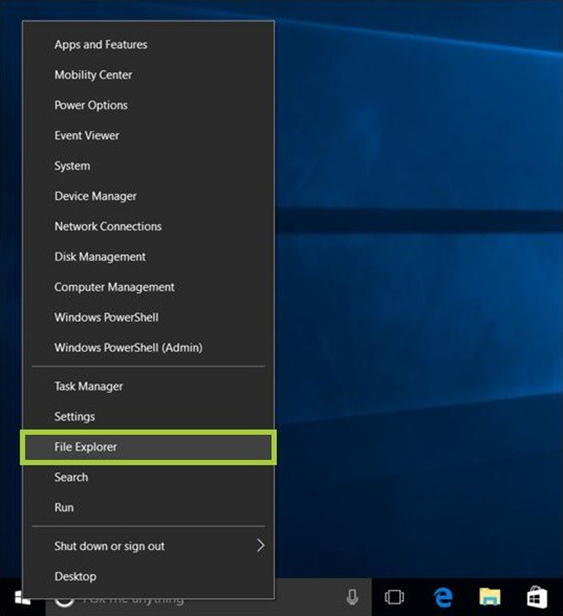
1.1 打开 文件资源管理器。(右键单击位于屏幕左下角的 Windows* “开始菜单”, 单击 “文件资源管理器”)。
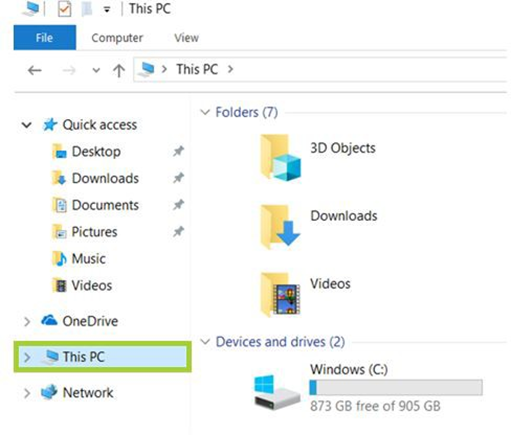
1.2 单击左侧面板上的“此 PC”。在中央面板的“设备和驱动器”下,将显示存储设备。
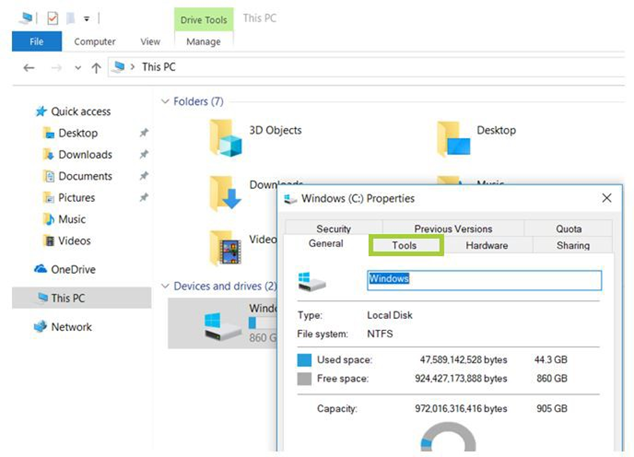
1.3 右键单击 要检查的驱动器(例如C:),然后选择“属性”。

1.4单击“工具”选项卡。
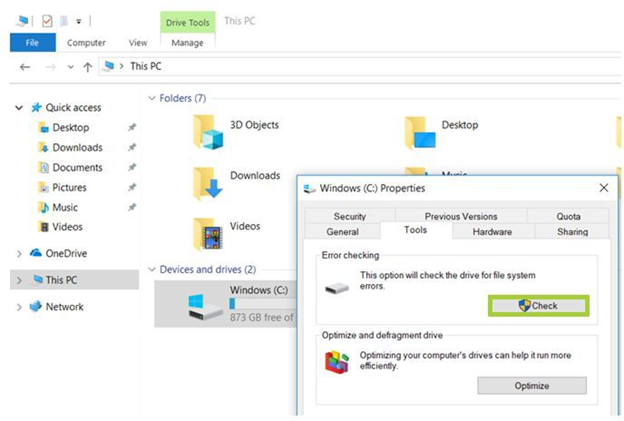
1.5 在“错误检查”下,单击“检查”按钮。
1.6 如果以前没有检测到未解决的错误,Windows* 将确认是否要扫描驱动器以查找错误。 单击 “扫描驱动器” 操作继续。
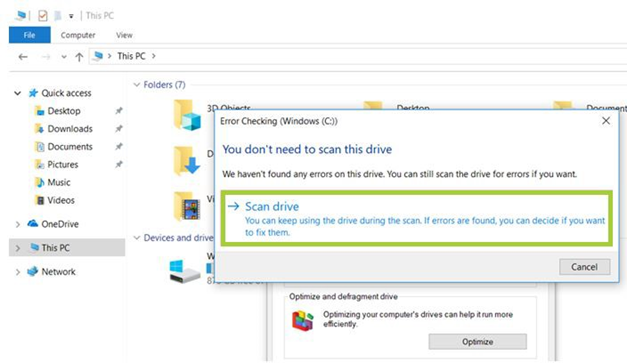
1.7 Windows* 将继续扫描驱动器以查找错误,并立即执行无需重新启动即可完成的任何修复。

1.8 扫描完成后,Windows* 将通知您是否检测到任何错误,如果是,它是否能够在不需要重新启动的情况下成功修复错误。
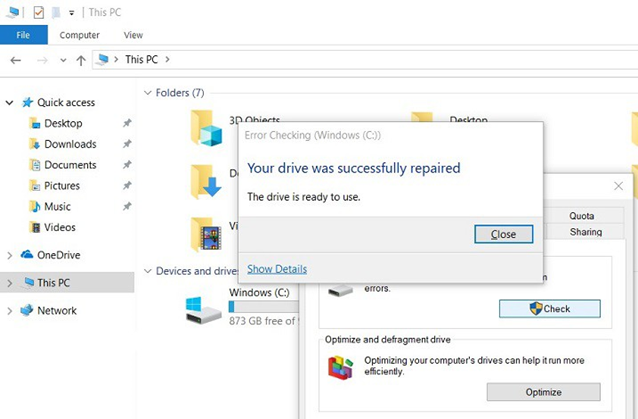
1.9 如果 Windows 检测到一个或多个需要重新启动的错误,系统将提示您重新启动。 退出 所有程序,然后 重新启动 系统。修复将在下次 Windows 启动之前自动开始。在修复过程中,进度将显示在屏幕上。
注意:
检查驱动器错误可能需要很长时间,尤其是在较大的驱动器上执行时。该过程完成后,可以在 Windows* 日志的“应用程序”文件夹下的 Windows* 事件查看器中找到结果摘要,包括发现的任何错误和所做的修复。
按照建议的步骤操作的某些最终用户可能会发现,在运行命令后,他们的硬盘空间显着减少。
此结果可能是由于硬盘驱动器故障造成的,因为驱动器错误检查执行的关键功能之一是识别和阻止驱动器上的坏扇区。
旧驱动器上的一些坏扇区通常不会被用户注意到,但如果驱动器出现故障或出现严重问题,则可能会有大量坏扇区,当通过错误检查映射和阻止这些扇区时,这些扇区似乎“窃取”了硬盘容量的很大一部分。
这是预期行为,这意味着这些扇区以及可能存储在它们上的任何数据都失败了。错误检查将尝试从坏扇区恢复数据,但某些数据可能已损坏,需要从备份中恢复。
1.10 对系统中的每个内部存储驱动器重复上述步骤 1.3-1.8。
2. Windows 部署映像服务管理器 (DISM)
部署映像服务和管理 (DISM) 工具内置于 Microsoft Windows® 10 操作系统映像中。此工具将检查并尝试修复 Windows 文件的完整性。
注意
建议在此过程中将系统连接到 Internet 。
若要了解有关此工具和此过程的详细信息,请参阅 Microsoft 的*“什么是 DISM?”一文。
2.1 以管理员身份运行“命令提示符”。
一个。 左键单击 Windows* “开始” 菜单。
b. 键入 “命令提示符”。
c.c. 右键单击 结果,然后选择 “以管理员身份运行”。
2.2 要扫描系统的运行状况, 请键入 以下命令,然后按 Enter。(命令操作可能需要几分钟才能完成。
dism/online /cleanup-image /scanhealth
2.3 要开始修复系统上任何受感染的 Windows 软件包,请键入以下命令,然后 按 “Enter”。 (可能需要几分钟才能完成命令操作。
dism/online /cleanup-image /restorehealth
2.4 如果显示此过程的任何问题或错误,请访问 Microsoft Windows 支持站点 以获取更多信息。
2.5 关闭 命令提示符窗口。
问题? 查看我们的社区 论坛 寻求帮助。
问题? 联系 Solidigm™ 客户支持:
[中文][简体中文][德语][日语][韩语]
成功